The first step when using DataJet is to create a project and import some data. If data has not yet been uploaded to the DataJet Server, see Uploading Data.
A project is a collection of a database, datasets, reports, dashboards and scripts. Think of a project as a folder which contains all the common materials that a team of users will share when using DataJet. All work that is done in DataJet is done within the container of the project. For more information on what a Project is, see Introduction to Projects.
Creating a new project and loading data
This video shows:
- Creating a project and loading sample data using Quick Load
- Initial data inspection
- Turning a sample load into a full load
Creating a project
Starting DataJet Explorer
If DataJet Explorer is not already running, first start the application and login (for more information on how to Log into DataJet, see Logging in to DataJet Explorer
Multiple methods are available, depending on the data source. For further details on loading data from different data sources, see TODO
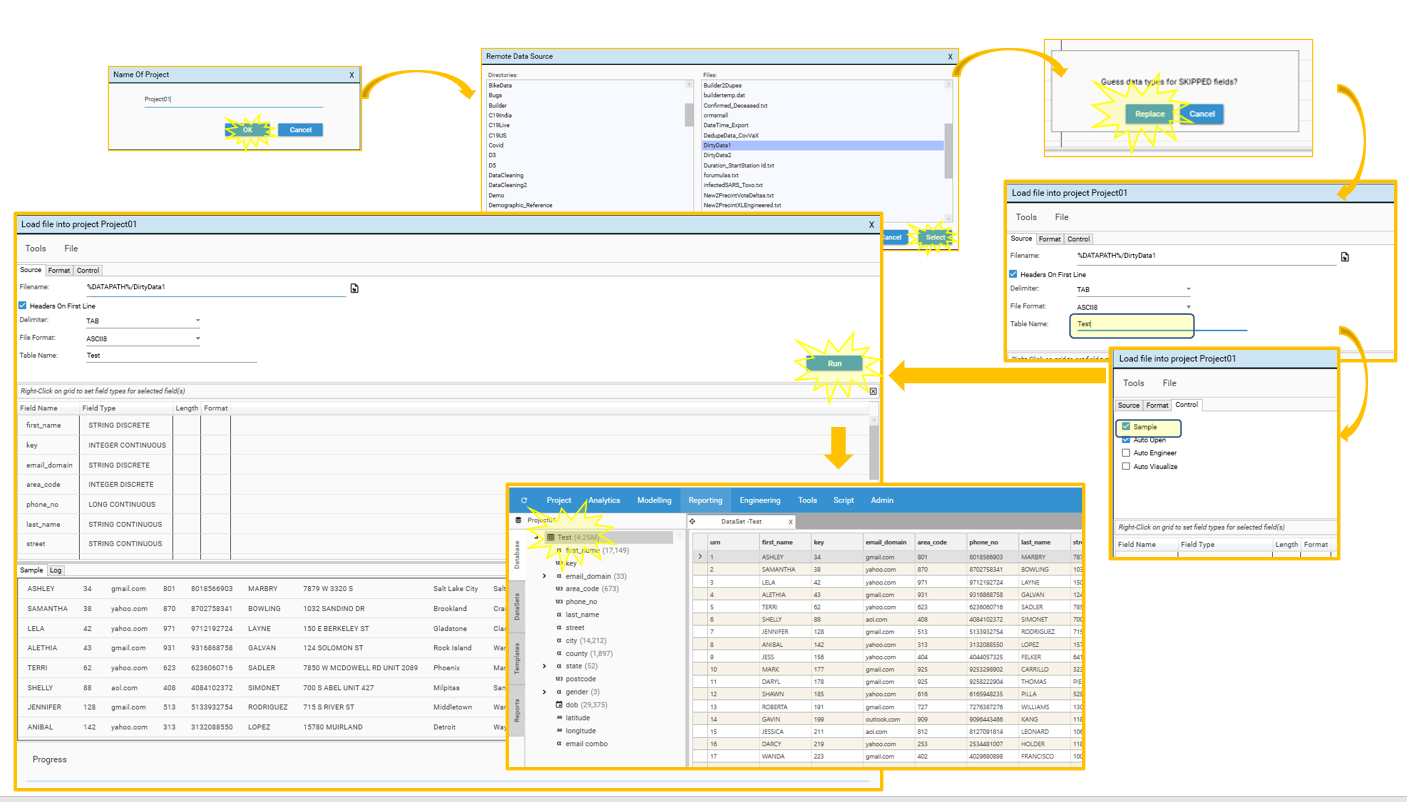
Method 1 - Loading Data from a delimited file
- From the Project Menu, select Quick Load | New Project From File
- Provide a project name (in this case, Project01)
- Click OK. The Load File dialog will be displayed.
- Select a file to import by clicking the file select icon (on the right-hand side of the page) to bring up the file selection dialog
- By default the Remote Data Source dialog will be displayed. This allows files which have been uploaded to the DataJet Server to be selected.
- To upload a file to the server, exit the Remote Data Source dialog and select File | Upload from the Importer dialog menu.
- For details on how to upload remote files to the server, see Remote File Manager
- To select files from anywhere on the local machine, press SHIFT + file select icon
- Choose a delimited file to upload and select Open/Select. Note that preview may be unavailable if the file has a large number of columns.
- Select Replace in response to the message "Guess Data Types for SKIPPED fields?"
- This will automatically fill in data types for the content of the file.
- The "Guess Data Types for SKIPPED fields?" message will not appear if the file has too many columns and no preview is available. Select Tools | Auto-guess Data types from the importer dialog menu.
- If potential continuous fields are detected, the "Identify Key Fields" dialog will be displayed - use the option button to help select fields which should be loaded as continuous.
- See Data Types for more information on different data types.
- Toggle on/off "Headers on first line" as appropriate
- Provide a Table Name (e.g., Test)
- If loading an unknown, potentially large file, consider selecting "Sample" from the Control Tab.
- This avoids wasting time when examining an unknown file for the first time.
- "Sample" will load a single buffer of records, so the number of rows loaded will depend on the number of fields and width of data.
- Click Run. The data will load, and a new table will be visible in the Database Explorer
- Inspect the table to ensure that it has loaded as desired (these steps apply to sampled and non-sampled data):
- Select the > Icon to expand the table and see the table schema
- Right-click the table object and choose Data View - a DataView tab will open
- Drag the table object and drop it onto the DataView grid in order to see the top 500 rows of data.
- Right-click on the DataView grid, choose Function | Random and specify a number of random records to inspect. Click OK to view the filtered results
- Select Analytics | Data Audit to see summary data for the table.
- Select a field in the Data Audit grid, right-click and choose from one of the available options to examine the data in more detail.
- NOTE: If a sample loads as desired, to quickly load the full table, do the following:
- Open Script | Script Editor
- Drag the newly created sample table (in this case, Test) into the Script Editor window. A CreateTableFromFile method will be added to the script
- In the Database Explorer, right-click the new table and choose Delete
- In Script Editor, click Run - the full table will now be loaded (say No to save script, and then choose Drop Project)
- Add more tables to the schema using one of the following
- Project | Quick Load | Add Table From File
- Script Editor | Import Data | Delimited File (Note - when using Script Editor to add further tables, use the script control methods (Run, Run Selected, Run to, Run From) to make sure only desired script commands are being executed.
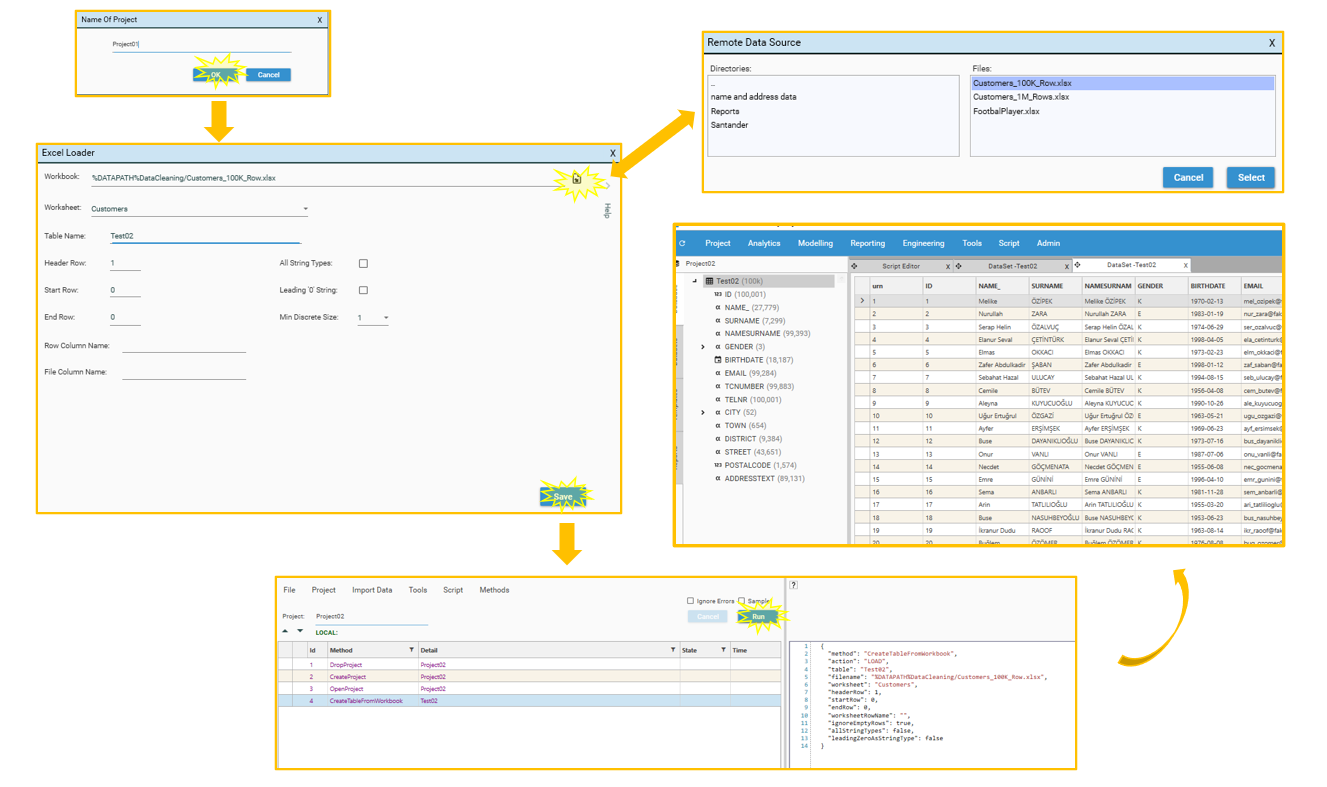
Method 2 - Loading Data From Excel
Note - make sure that the excel file to be loaded into DataJet is not being used by any other process.
- From the Project Menu, select New
- Provide a project name (in this case, Project02). A Script Editor window will be opened.
- Select Click Import Data | Excel File. The Excel Loader window will be opened.
- Select a file to import by clicking the file select icon to bring up the file selection dialog
- By default the Remote Data Source dialog will be displayed. This allows xlsx files which have been uploaded to the DataJet Server to be selected. For details on how to upload remote files to the server, see Remote File Manager
- To select files from anywhere on the local machine, press SHIFT + file select icon
- Select the Worksheet to load from the Worksheet drop down
- Provide a Table Name
- Specify which row contains the header data (default is 1)
- Click Save - a CreateTableFromWorkbook method will be added to Script Editor
- NOTE: When loading data from Excel, there is no need to sample data as the maximum size of data contained in an excel file is smaller than DataJet's sample size.
- Click Run (say No to save script, and then choose Drop Project). The data will load, and a new table will be visible in the Database Explorer. (Note that it takes longer to load data from Excel than from delimited file)
- Inspect the table to ensure that it has loaded as desired (these steps apply to sampled and non-sampled data):
- Select the > Icon to expand the table and see the table schema
- Right-click the table object and choose Data View - a DataView tab will open
- Drag the table object and drop it onto the DataView grid in order to see the top 500 rows of data.
- Right-click on the DataView grid, choose Function | Random and specify a number of random records to inspect. Click OK to view the filtered results
- Select Analytics | Data Audit to see summary data for the table.
- Select a field in the Data Audit grid, right-click and choose from one of the available options to examine the data in more detail.
- Add more tables to the schema using one of the following
- Project | Quick Load | Add Table From File
- Script Editor | Import Data | Delimited File
- Script Editor | Import Data | Excel File (Note - when using Script Editor to add further tables, use the script control methods (Run, Run Selected, Run to, Run From) to make sure only desired script commands are being executed.