Introduction
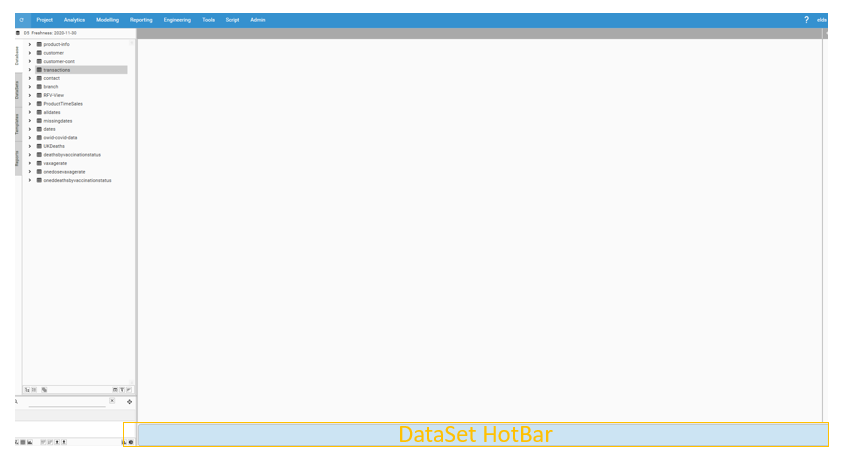
The DataSet HotBar is a dynamic space for working with DataSets and a key component of the DataJet solution. It offers instant access to commonly used DataSet actions, as well as providing a temporary store for records and segments of interest. DataSets that are in the HotBar will persist for the life-time of the active session.
This article introduces all functional elements of the DataSet HotBar.
Adding a DataSet to The HotBar
<<TODO - Video - Creating DataSets in the HotBar>>
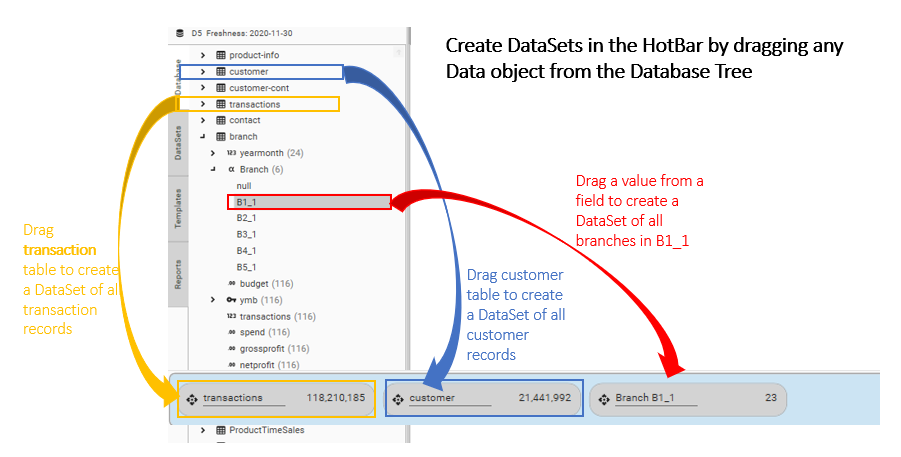
DataSets can be created in the HotBar by dragging and dropping objects and selections from other workspace areas such as charts, dashboards and the database tree:
Creating DataSets from Fields
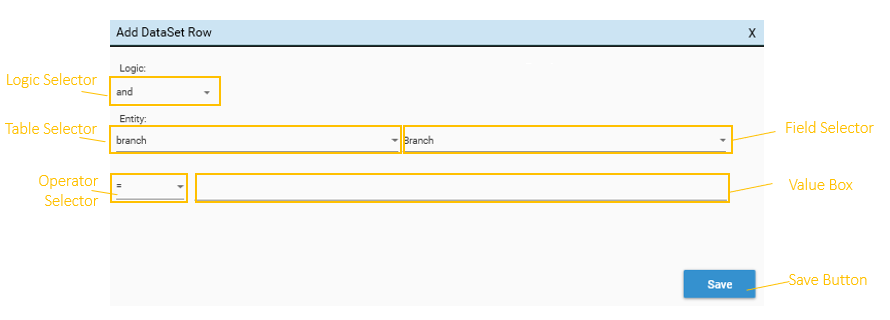
Dragging a field from the Database Tree and dropping it on the HotBar will bring up the Add DataSet Row dialog:
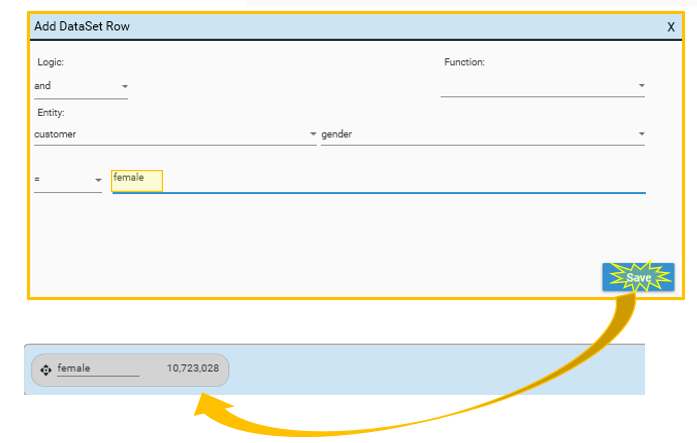
This allows a detailed query to be constructed. The simplest type of query simply selects all records with a particular field value - to create a DataSet of field values, type the field value in the value box and select Save. The DataSet will appear in the HotBar.
As well as selecting tables and fields, Operators and Logic can all be modified to create the precise query that is required.
Logic
| Logic Operator | Description | Details |
|---|---|---|
| and | selects all records that are in the query | see ANDing DataSets |
| or | selects all records that are in the query | see ORing DataSets |
| remove | selects all records that are not in the query | see Remove DataSet |
Operators
| Operators | Description | Detail |
|---|---|---|
| = | equal to | selects all records where {field value} exactly matches the content of {value box} |
| < | less than | selects all records where {field value} is less than value in {value box} |
| > | greater than | selects all records where {field value} is greater than value in {value box} |
| >= | greater than or equal to | selects all records where {field value} is greater than or equal to value in {value box} |
| <= | less than or equal to | selects all records where {field value} is less than or equal to value in {value box} |
| != | not equal to | selects all records where {field value} is not equal to value in {value box} |
| between | between | selects all records where {field value} is between the {lower value} and the {upper value}. Includes records that match {lower value} and {upper value}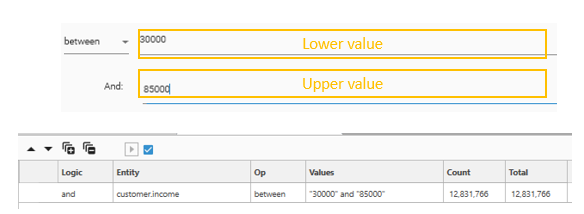 |
| within | within | selects all records where {field value} is found in the labels of the result grid produced by the report in the {value box}. {value box} is automatically populated with applicable reports.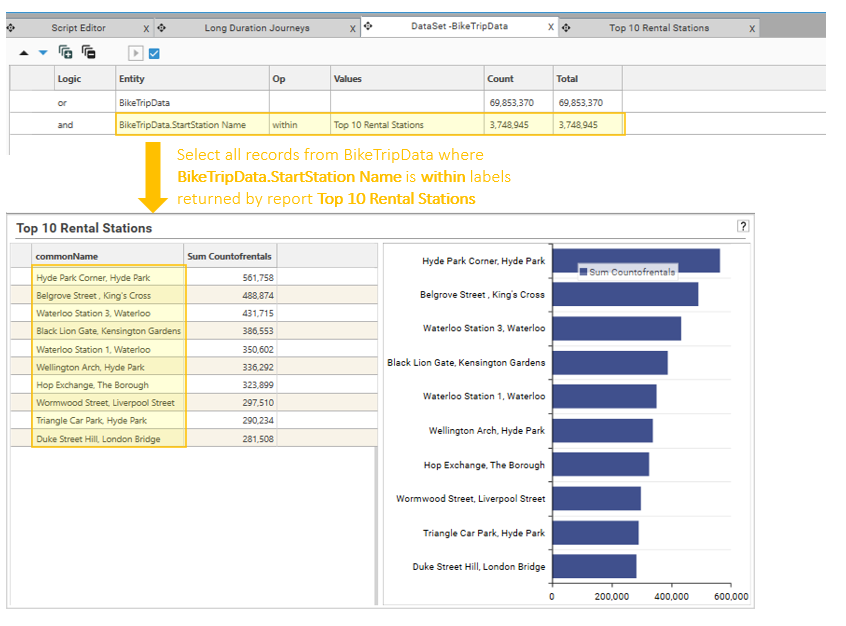 Supported Reports The report specified in {value Box} for the within operator must be a 1 dimensional profile. The labels in the report will be compared to the values in the selected field. |
| in | in | selects all records where {field value} matches one of the list of values checked in {value box}.  |
| like | like | selects all records where {field value} matches the value in {value box} case insensitive allows a wildcard search to be performed:
|
| cslike | case sensitive like | selects all records where {field value} matches the value in {value box} case sensitive allows a wildcard search to be performed:
|
| first discrete | first occurence of | selects the first occurrence of each unique value for the specified field See Intrinsic Functions - Overview for more details. |
| last discrete | last occurence of | selects the last occurrence of each unique value for the specified field See Intrinsic Functions - Overview for more details. |
DataSet Fields
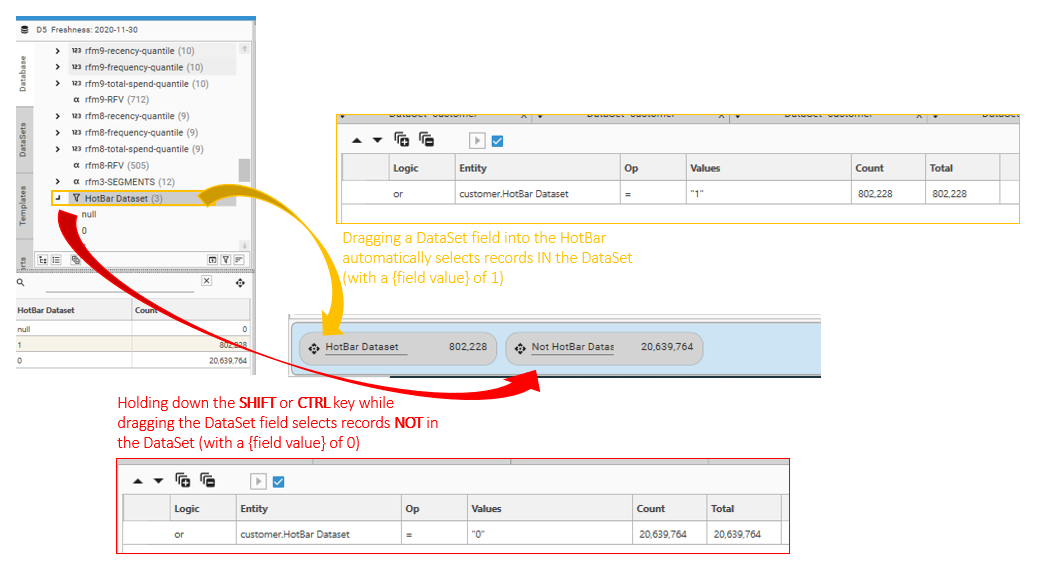
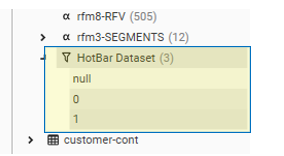
DataSet fields have some special properties that allow them to work easily with the HotBar. Unlike other fields, when a DataSet field is dragged from the Database Tree and dropped on the HotBar, the Add DataSet Row dialog is not displayed - instead a DataSet is created of all records that are IN the dropped DataSet. This is the equivalent of selecting a {field value} of 1. Hold down the CTRL key when dragging the field to select {field value} of 0.
Creating DataSets from Reports and Dashboards
DataSets can be created from Result Grids and Charts in Reports and Dashboards.
To select from a single segment from a chart, click the desired segment - when the segment is highlighted it has been selected - and then drag into the HotBar.
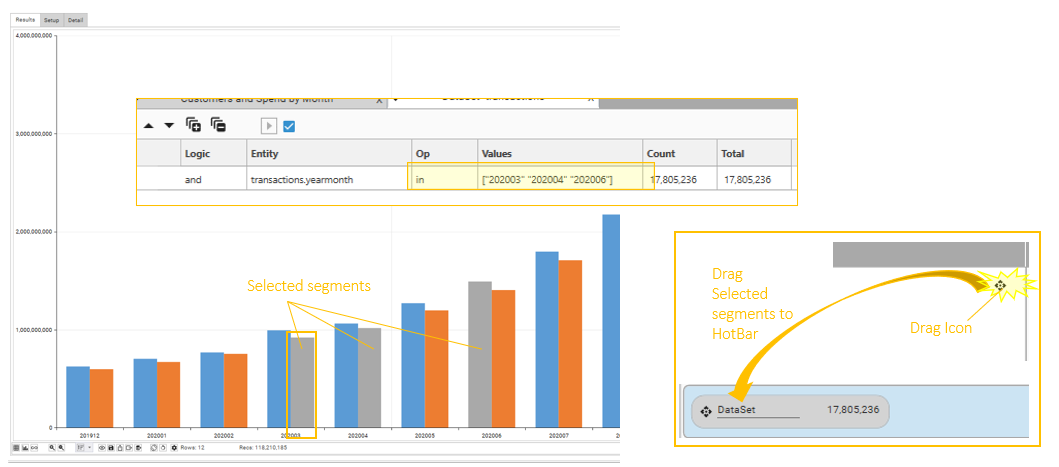
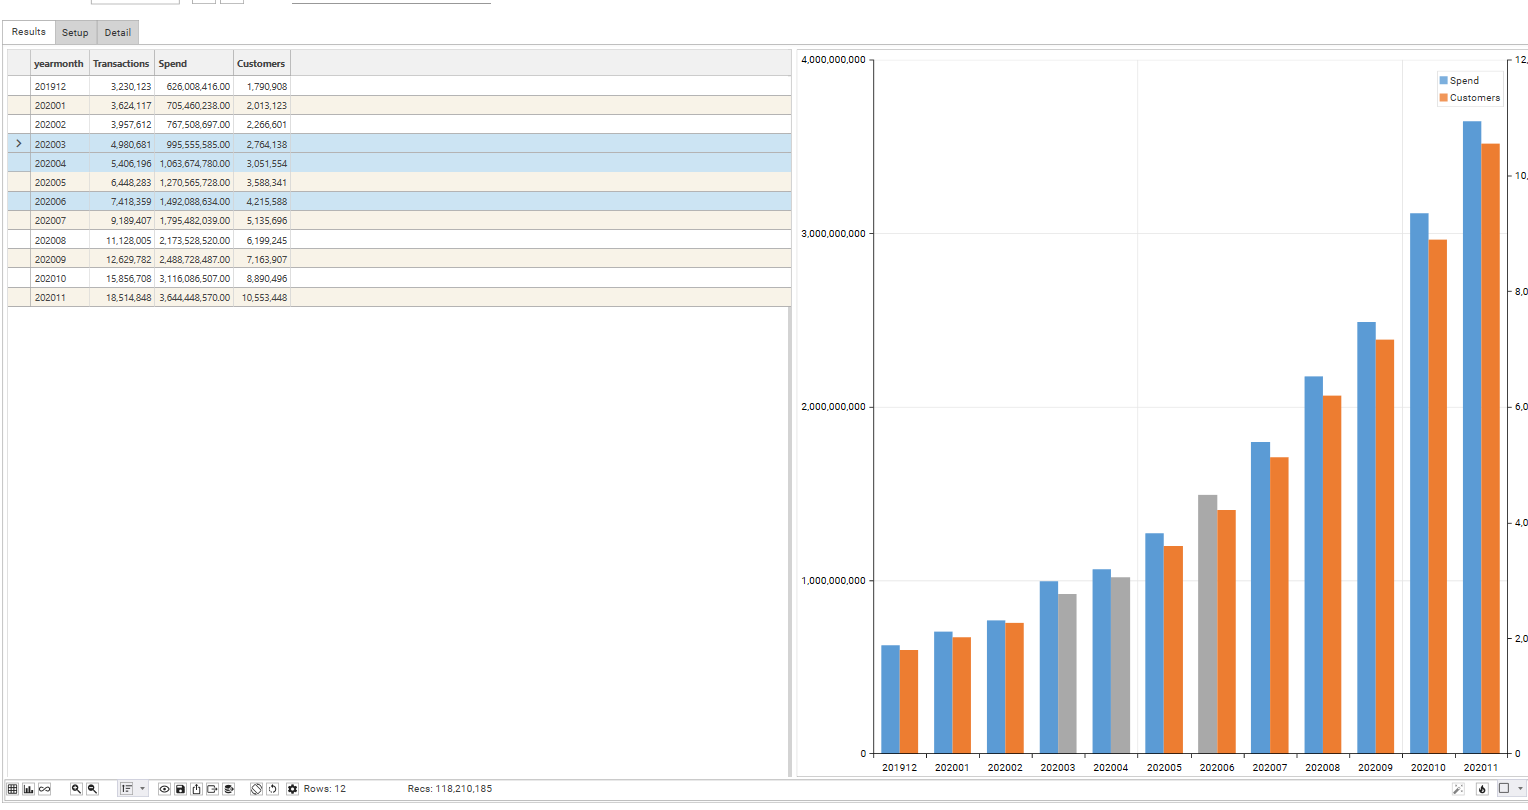
To select multiple segments, click the desired segments and check that they are highlighted. Create the DataSet by dragging the drag icon from the report into the HotBar. An "in" query will be created and the resulting DataSet added to the HotBar.
Clicking on a segment in a chart also highlights the relevant segment in the result grid. Hold down the CTRL key to select individual rows in the result grid or use the SHIFT key to select a range. Selected data can be dragged directly from the grid, or from the Drag Icon and then dropped in the HotBar.
Creating DataSets from Saved DataSets and Collections
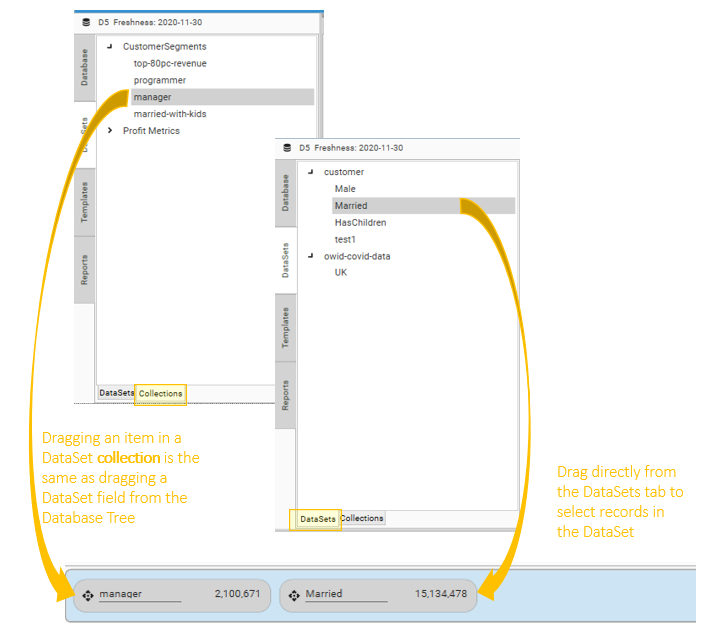
DataSets can also be dragged into the HotBar from the DataSets Tab.
To select records not in a DataSet field, hold down the CTRL key when dragging the DataSet field into the HotBar
Use within to select records that are in the row labels of a profile result grid
Deleting DataSets
To delete a DataSet from the HotBar, select the DataSet to be deleted, and choose Right-Click Delete. The DataSet will be removed from the HotBar and from the system. To clear the HotBar of all DataSets, Right-Click on the HotBar and choose Delete All.
- Deleting a DataSet from the HotBar will permanently remove the DataSet from the project. If the DataSet may be required again in this or other sessions, before deleting the DataSet, save a permanent copy of it using Right-Click | Save
- All DataSets in the HotBar are automatically deleted when the session ends - i.e., when the user logs out.
Saving DataSets
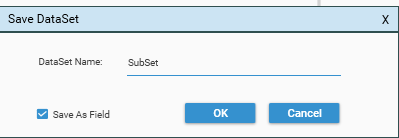
To store a permanent record of the rules used to create a HotBar DataSet, select the DataSet and choose Right-Click | Save. The Save DataSet dialog will be displayed.
By default the DataSet will be added as a new DataSet field on the owner table:
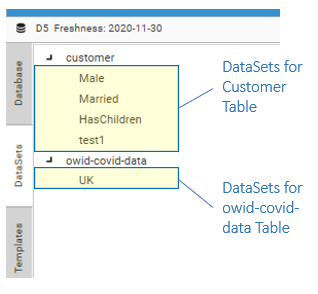
Unchecking the "Save As Field" box will add the new DataSet to the DataSet Tab of the Project Explorer instead. Within the DataSet Tab, DataSets are automatically grouped by table:
Once saved, a copy of the DataSet can be dragged from either the Database Tree or the DataSet Tab into the HotBar.
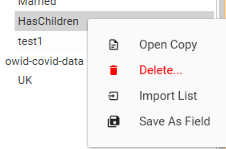
From the DataSet Tab, a copy of a saved DataSet can be added to the owner table as a DataSet field by selecting Right-Click | Save As Field.
Combining DataSets
<<TODO - Quick Snippet - Combining DataSets>>
One of the key features of DataJet is the ability to perform set operations on DataSets. The HotBar provides a drag and drop interface for these operations.
DataSets can be combined using one of the following mechanisms:
- And
- Or
- Remove
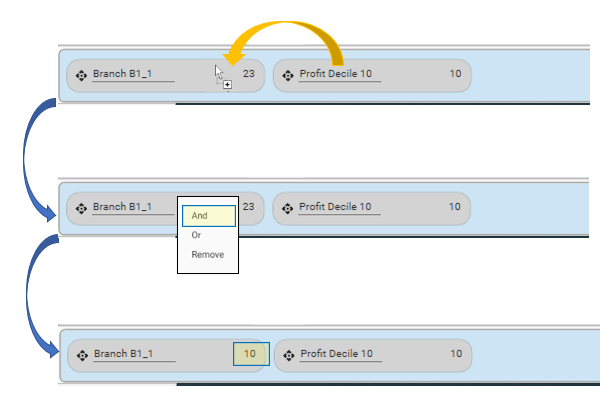
Dropping a DataSet onto a DataSet that is in the DataSet HotBar will bring up the DataSet Drop Menu:
ANDing DataSets
ANDing two DataSets creates a DataSet that contains only the records that are in both DataSets. In the table below, a 0 represents a records that is NOT in the DataSet, whereas a 1 represents a record that is in the DataSet.
- Record 1 is not in either DataSet 1 or DataSet 2.
- Record 2 is in just DataSet 1
- Record 4 is in just DataSet 2
- Records 3 and 5 are in DataSet 1 and Dataset 2
| Record No | DataSet 1 | DataSet 2 | DataSet 3 (DataSet 1 AND DataSet 2) |
|---|---|---|---|
| 1 | 0 | 0 | 0 |
| 2 | 1 | 0 | 0 |
| 3 | 1 | 1 | 1 |
| 4 | 0 | 1 | 0 |
| 5 | 1 | 1 | 1 |
| Total | 3 | 3 | 2 |
Selecting And will change the existing DataSet so that only records which are also in the dropped DataSet are included. In the example above, Records 2,3 and 5 are in the existing DataSet (DataSet1). DataSet2 is dropped on using the AND option. Records 3 and 5 are in both DataSet1 AND DataSet2 and so the resulting DataSet contains 2 records.
There is no limit on the size of the DataSet that can be manipulated in this way. DataSets containing hundreds of millions of records will re-combine almost instantly in the DataSet HotBar.
ORing DataSets
ORing two DataSets creates a DataSet that contains records that are in at least one of the DataSets:
| Record No | DataSet 1 | DataSet 2 | DataSet 3 (DataSet 1 OR DataSet 2) |
|---|---|---|---|
| 1 | 0 | 0 | 0 |
| 2 | 1 | 0 | 1 |
| 3 | 1 | 1 | 1 |
| 4 | 0 | 1 | 1 |
| 5 | 1 | 1 | 1 |
| Total | 3 | 3 | 4 |
Remove DataSet
Selecting Remove from the DataSet Drop menu will remove the records from the dropped DataSet from the original DataSet:
| Record No | DataSet 1 | DataSet 2 | DataSet 3 (DataSet 1 REMOVE DataSet 2) |
|---|---|---|---|
| 1 | 0 | 0 | 0 |
| 2 | 1 | 0 | 1 |
| 3 | 1 | 1 | 0 |
| 4 | 0 | 1 | 0 |
| 5 | 1 | 1 | 0 |
| Total | 3 | 3 | 1 |
Undo
To undo the last operation on a DataSet, choose Right-Click | Undo. This will restore the DataSet to the point before the last DataSet operation. Undo can be selected repeatedly, until the DataSet reaches its initial state.
Invalid DataSet
If a DataSet from an unrelated table is dropped onto a HotBar DataSet, the DataSet Count will be displayed as [...]. Selecting Right-Click | Open Copy will open a DataSet Scratch Tab in the Workspace and the invalid DataSet Error message will be displayed (Error calculating dataset. No intermediate record set from relationship):
Use Engineering | Joins to make a relationship between 2 un-linked tables. Matching records must be present on each table for a valid link to be formed.
HotBar Right-Click Menu
<<TODO - Video - DataSet Functions>>
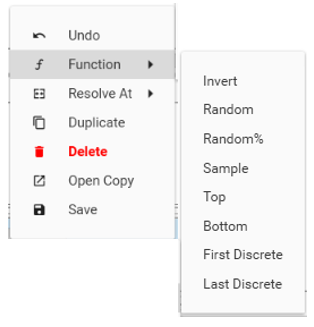
Right-Click a DataSet in the DataSet HotBar to show the HotBar Right-Click Menu. This provides access to all common DataSet operations.
Function
Selecting an item in the function menu will apply an intrinsic function query rule to the existing DataSet. The available intrinsic functions are:
- invert()
- random(X)
- random%(X.XX)
- sample(X)
- top(X)
- bottom(X)
- firstdiscrete(table.field)
- lastdiscrete(table.field)
- highdiscrete(table, table.field)
- topby(table.field, X)
- bottomby(table.field, X)
For more information on intrinsic functions, see Intrinsic Functions - Overview
Resolve At
<<TODO - Video - Queries and Resolution Levels>>
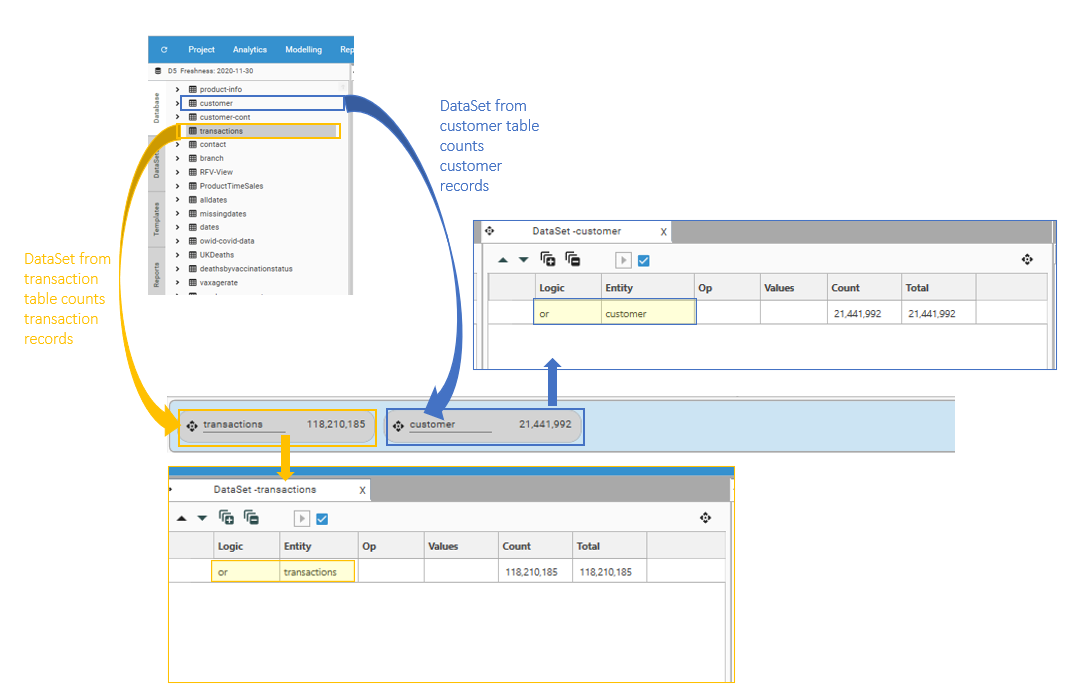
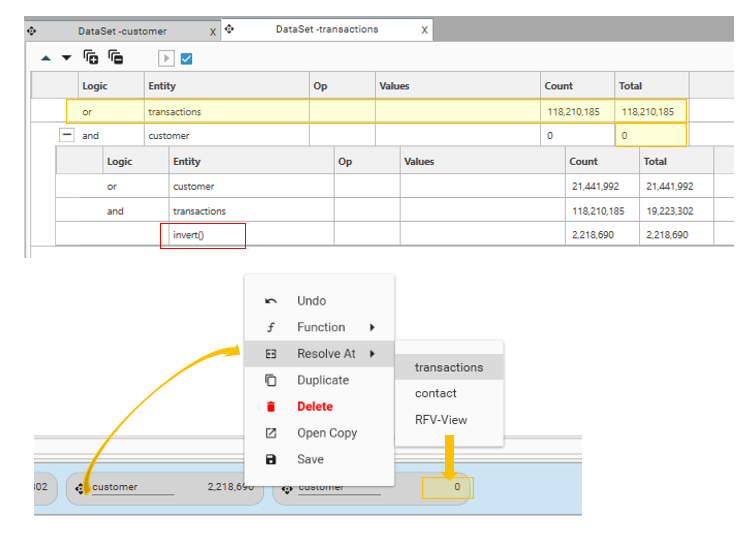
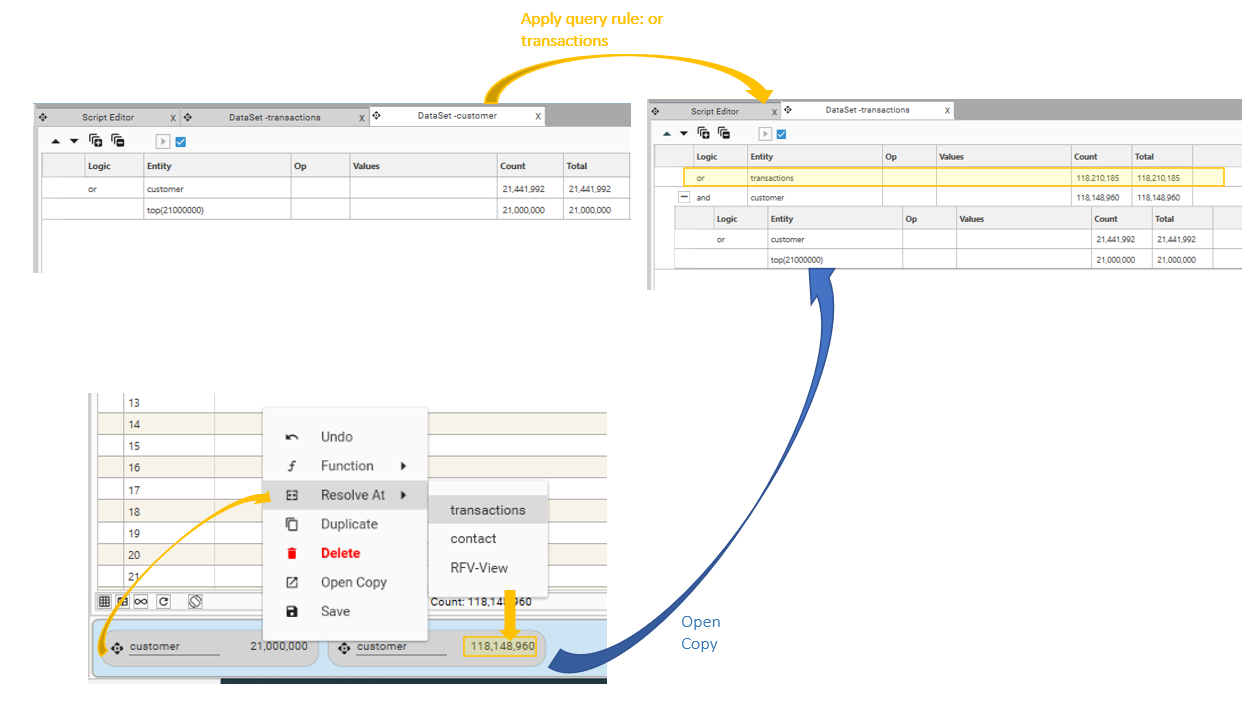
Determines the records that will be counted. When a DataSet is created in the HotBar, the DataSet count is shown. This count relates to the "owner table" or "resolution table" of the DataSet, and is the table from which records are being counted. Unless explicitly set otherwise, by default, the resolution level is the table from which the DataSet was created, and this is the table that the DataSet is "resolved at". So in the example below, the first DataSet is "resolved at" the transaction level, and the second DataSet is "resolved at" the customer level:
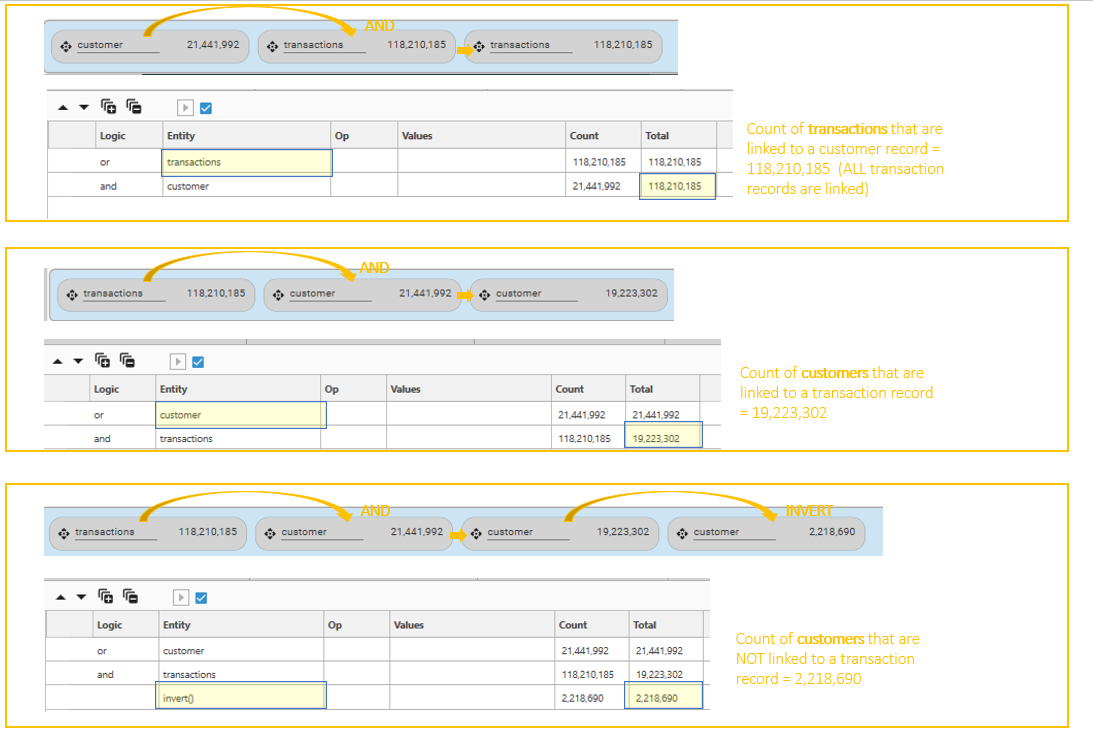
The first line of the DataSet query shows the resolution level of the DataSet - i.e., which records are being counted. The first example below is resolved transactions - ie., is counting transaction records. The second two examples are both resolved at the customer level.
The DataSet HotBar can be used to change the resolution level of a query - i.e., to change what is being counted. In the example below, the count of customers that are NOT linked to a transaction has been "resolved at" the transaction table. This returns a count of 0, because the starting DataSet contained only records that had no link to the transaction table:
All possible changes to resolution level are displayed in the Resolve At Menu. Different options are available depending on the current resolution level, or owner table of the DataSet.
The Resolve At command puts the existing query into a subset, and ANDs it to all records from the selected table.
Duplicate
Creates another HotBar DataSet as an exact replica of the selected DataSet
Delete
Permanently deletes the DataSet from the HotBar and from the system. Copies of DataSets that were stored in the DataSet Tab can be recreated as necessary by redragging into the HotBar - any changes that were made to DataSets in the HotBar will be lost unless the modified DataSet is resaved as either a field or a DataSet..
To delete all DataSets in the HotBar, right-click in the HotBar itself and choose Delete All.
Open Copy
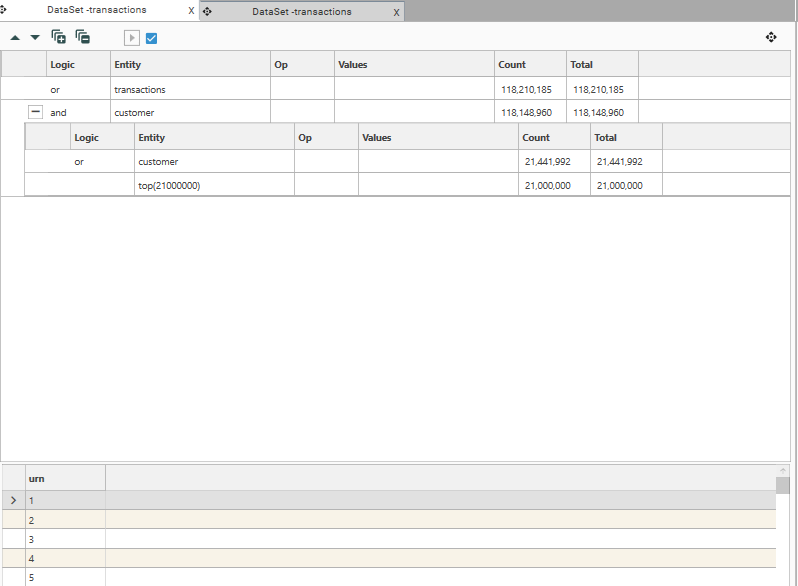
Select Right-Click | Open Copy. A new DataSet Scratch tab will be created from the selected DataSet allowing the Query Rules and the RecordView for the DataSet to be viewed and edited.
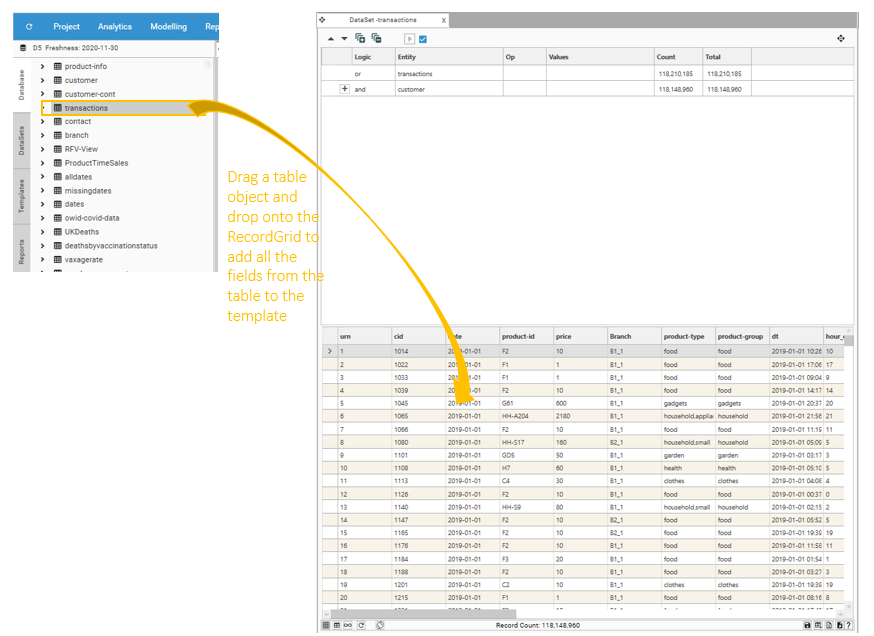
- Add Columns to the RecordView grid by dragging fields from the Database Tree and dropping them on the RecordView grid - only fields from the DataSet owner table can be added to the grid.
- To add all fields for the owner table, drag the table object from the Database Tree and drop it on the RecordView grid.
The DataSet Scratch tab will have an empty Column Template and a RecordView grid that shows only the record URN:
Add Columns to the RecordView grid by dragging fields from the Database Tree and dropping them on the grid - only fields from the DataSet owner table can be added to the grid. To add all fields for the owner table, drag the table object from the Database Tree and drop it on the RecordView grid.
Save
Brings up the Save DataSet dialog. See Saving DataSets for more detail.
