Plugins (or extensions) allow repeatable actions to be added to the Desktop Application as new dialogs under the "Extensions" menus.
Various plugins are shipped by default with DataJet Server. It is also possible for users to develop new plugins and add them to the system for general use.
Available Plugins
Note: This list is configurable - some or all of these plugins may be provided by the active DataJet Server
- Analytics
- RFM
- Quick RFM
- RFM (Filtered)
- Scatter Report
- Dashboards
- Daily Dashboard
- RFM
- Modelling
- Clustering
- Fuzzy String
- Full Linear Regression
- Non Linear Regression
- Helpers
- Engineering
- Scan Rank
Plugin File Format and Content
JSON - Plugins are stored in JSON files. The high-level structure of the file is:
- Header - contains details of plugin type, location, menu, help text etc
- uivariables - Specifies the input selectors for the process
- script - the DataJet script to be executed
- onView - the report to view when the
For more details of the required JSON structure, see Plugin Script Structure
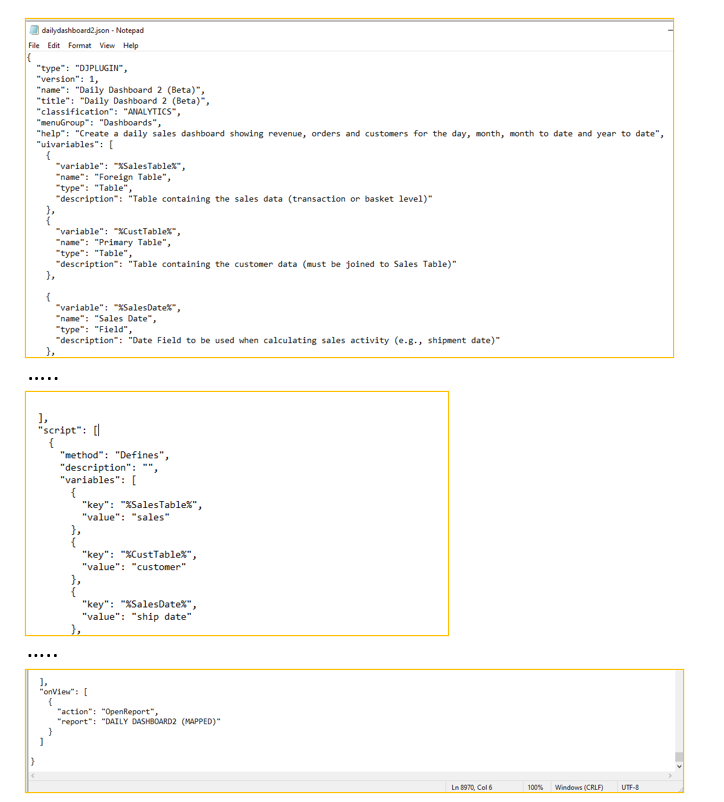
{
  "type": "DJPLUGIN",
  "version": 1,
  "name": "Dialog Title",
  "title": "Menu Display Text",
  "classification": "MENU NAME",
  "menuGroup": "Sub Menu Text",
  "help": "Create a daily sales dashboard showing revenue, orders and customers for the day, month, month to date and year to date",
  "uivariables": [],
  "script": [],
  "onView": []
}
Creating a Plugin
To create a plugin, use the following process:
- Design the plugin (perhaps through experimentation with Desktop UI, Engineering, report Building etc). Focus on:
- Final Report Design/Required Plugin output
- Identifying variables that users need to be able to configure
- Noting any fields, tables or datasets that need to be engineered by the plugin
- Identify essential input variables. This should include:
- All Primary Source tables and fields
- All Primary Datasets
- Any other variable inputs (numbers, strings, labels etc)
- Try to keep the number of inputs to a minimum by developing a process where all required engineered fields are built by the plugin. For example, Customer.FirstOrder can be generated in script so long as (Sales.CustomerID and/or CustomerTable) and (Sales.OrderDate) have been provided as input variables.
- Consider creating a special "Plugin" project, where input objects (objects that are likely to have the same function but different names across databases and projects) are loaded with variable format names.
- For example, name the sales table %SalesTable%, name sales.shipdate as %SalesTable%.%OrderDate%, name the customer table %CustTable%...
- Once the plugin project has been created, save the script to recreate it from scratch
- in the plugin project, manually go through all the steps required to create the final plugin report/output (as determined in Step 1)
- Use the Project History to add all those actions to a script.
- Parameterise all input variables
- i.e., add a DEFINES section and replace all primary source tables and fields with the variable equivalent.
- For example, sales.ship date might be replaced with %ForeignTable%.%OrderDate%
- NOTE: If a "plugin project" has been created (Step 3) and used to manually create the final plugin output, the methods extracted from the Project History should already have the correct variable names in them
- Test the script
- Put in test values in the DEFINES section
- Run the script in script editor, if possible against multiple projects/databases so that the parameterisation can be tested
- Confirm that output is as expected
- Save the script
- Create a new Plugin JSON file
- Complete the Header section (i.e., type, version, name, title, classification, menuGroup, help)
- Add a uivariable element for each required input (see Plugin Script Structure for examples)
- Insert the script (as tested in Step 5) into the script section (Make sure that the Defines/Script section matches with the uivariable list)
- Save the file
Adding a plugin to the server
Add the plugin to the system and test:
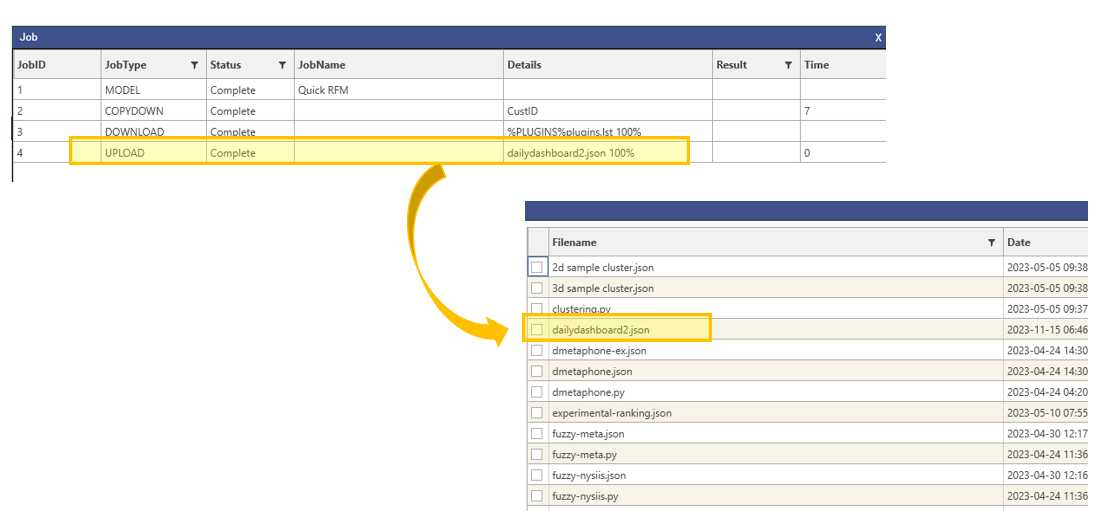
- Go to Admin | Remote Files
- Upload the new plugin file (xxx.json) into the plugins folder
- Download client.lst
- Add the new plugin name to the list in client.lst (use notepad or some other text editor)
- Upload the modified client.lst file
- Select the Plugins folder, right-click and choose "Refresh Plugins"
- The new plugin should now appear in the designated extension menu.
NOTE
- plugins.lst can also be used to store names of plugins, but this will be overwritten when the software is upgraded. client.lst is NOT overwritten during upgrade
- use Admin | Command Line | refresh plugins to update client plugins without restarting the server

 Upload plugin.json to the server
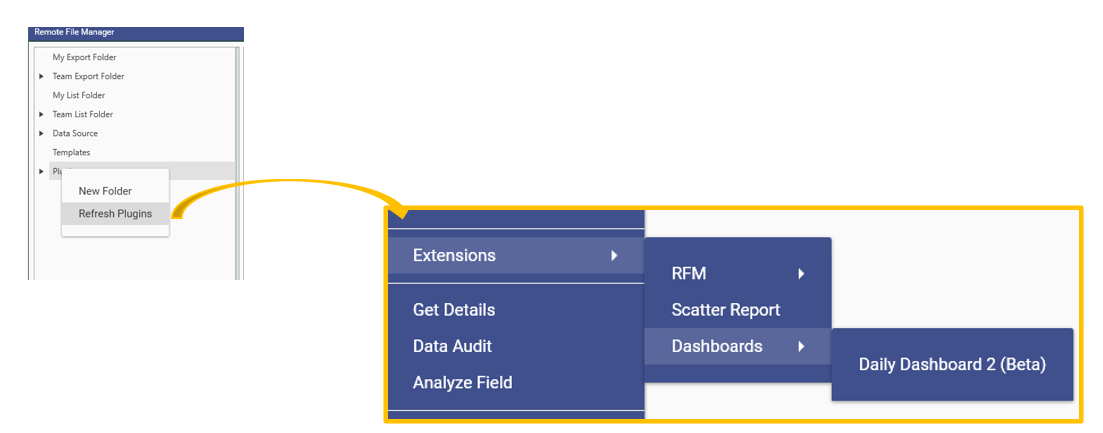 refresh plugins